Punch out game

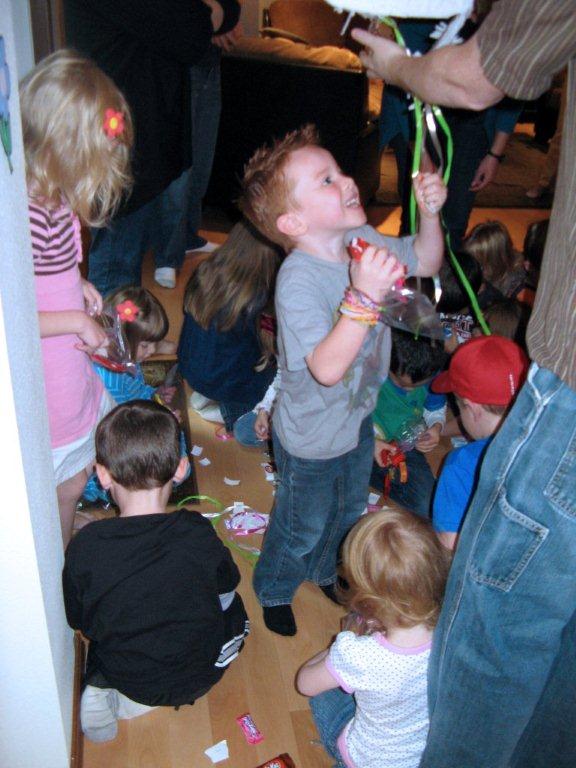
Hey all!  Birthday season for us is starting again, so time to get blogging!  In this post, I wanted to show how I made a game for Nora’s candyland party.  You can play it that if you answer a trivia question right you get one punch or you can do what we did where everyone just gets one punch.  🙂  I made this game for a Candyland party and the circles are intended to look like button candy.  They kids had a lot of fun punching and discovering what prize they were going to get! 

To make:
Supplies needed:
4 sheets of poster board
2 sheets of foam core posterboard
colored tissue paper
scissors
packing tape
18 small paper lunch bags
duct tape
18 paper bowls
18 prizes that easily fit in the paper bags and aren’t too heavy

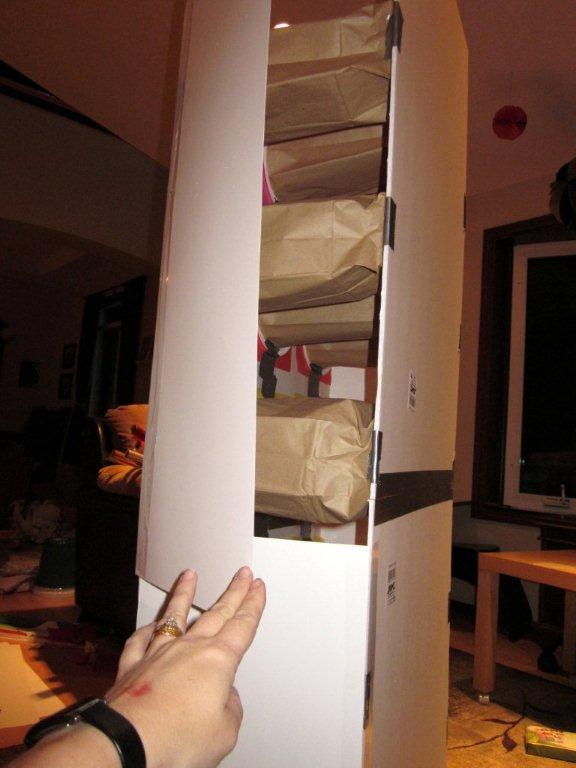
First I taped 2 foam core pieces together to make it longer
Also, tape 2 of the regular posterboard pieces together (the foam core may be longer than the posterboard, but that’s ok)

Next pencil out 9 even circles on each piece of posterboard 3 X 3 X 3  (18 total)  Mine are about 5 3/8″ in diameter, but if you can make them closer to 5″ then it will be a better fit when we tape on the bowls.
Cut out the circles.

Once you have the circles all cut out… lay the circles overtop of the foam core boards, with the bottom even and as close to centered side to side as you can.  Then mark the center of each circle (on the heavier foam core board) with a small X.

Now working with the heavier board, start duct taping the paperbags to the board centering the bag over the X’s you marked. 

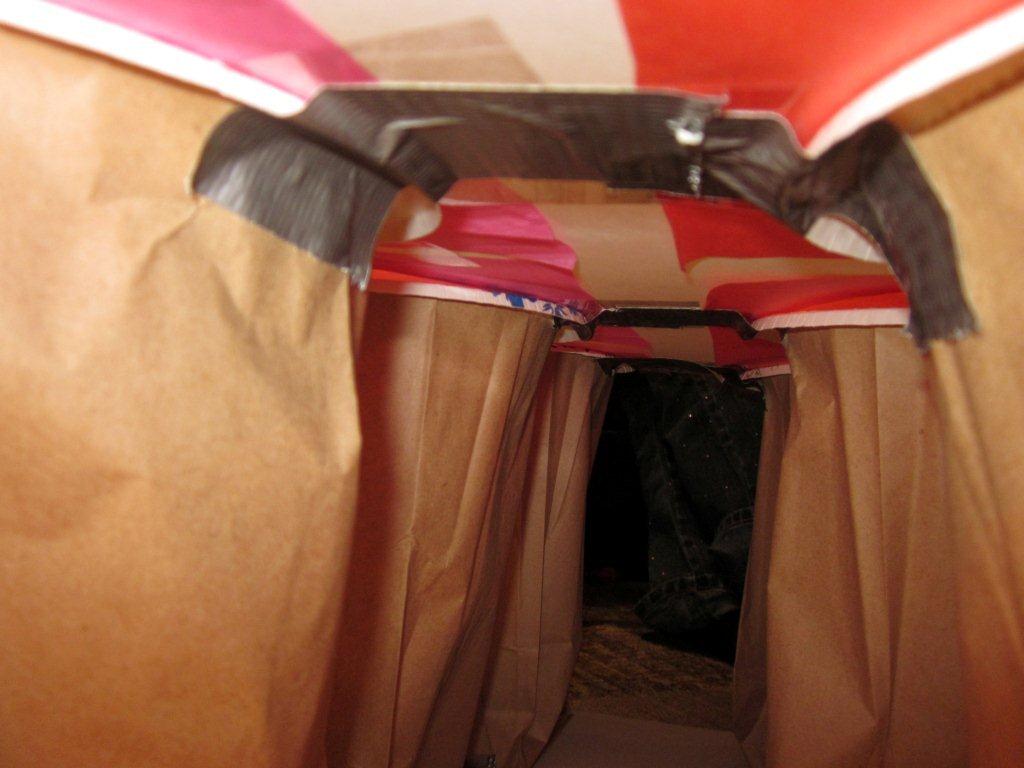
Once you have all the bags taped on, set aside.  Back to the posterboard with the cut circles; cut out squares of colored tissue paper to cover the holes and tape them (with the clear packing tape) over the circles on the back side of the board.  I used pink on top, next orange, then 2 rows of yellow, then green, and lastly blue.

 
 Next, you need to cut of the bottoms of the bowls.


And tape them onto the top (opening) of the paper bags… I added these bowls when I realized I was having a hard time keeping the paper bags open… worked brilliantly. 


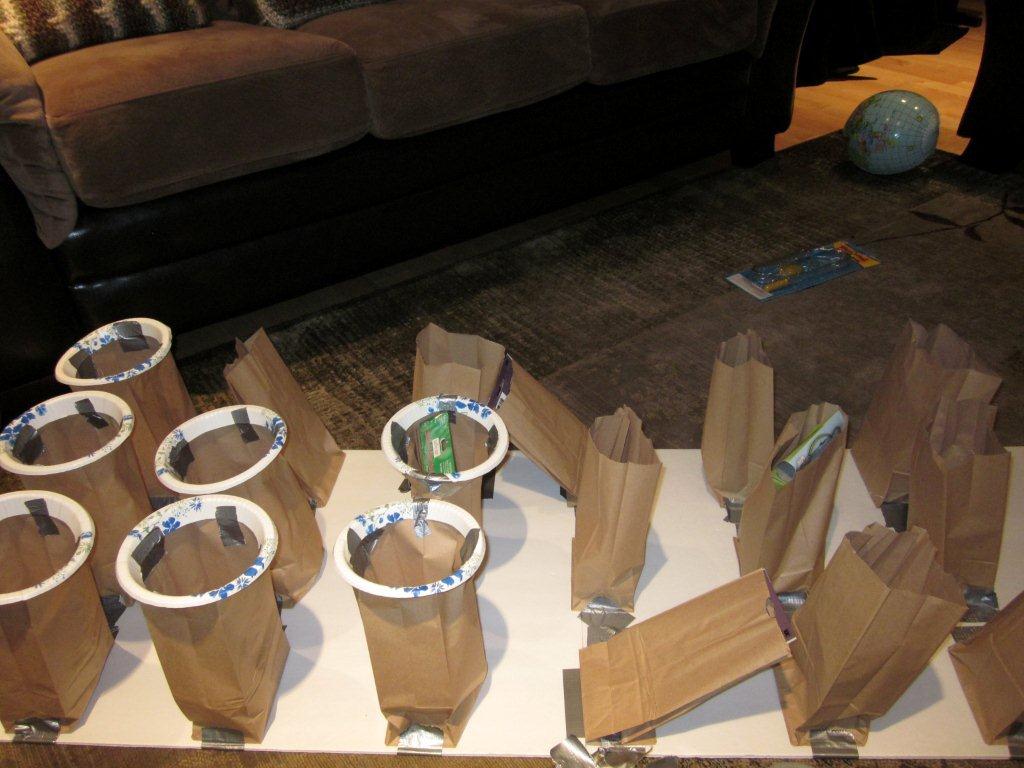
Fill all the paper bags with the prizes.
Now comes the tricky part.  Gently place the tissue paper-covered circles posterboard (taped side down) ontop of the prepared paperbags.  Make sure the bottom is close to aligned, so it can stand upright when we’re done.

Now, get down low on the ground and duct tape the tops of the bowls to the underside of the tissued circles aligning them together and careful not to let the duct tape show through.  Best to start in the middle and work your way out to the edges.

I found that I should have put more tape to help them to stay in place better. The heavier prizes in mine did tend to slip down a bit.
Carefully tip it upright. And lastly, measure and cut strips from the last two pieces of posterboard to tape onto the sides to cover the messy inside taping stuff.  

 Whaalaaah!  Enjoy punching!


We had a hoot! (Owl Themed baby shower)

So, last weekend I hosted a baby shower for my bestie.  She is going to have a boy in August!  It was probably the most fun baby showers I have planned so far.  There are a lot of cute ideas for owl themed stuff out there, but actually most were geared toward girls (AKA pink)  and others were more “barn owl” style, which is a little too flea market like for what I was looking for.  But I still did get a lot of great ideas from my online research. 
So after the date was decided, I got the guest list from the momma-to-be and saw that it was 59 people… so, first thing on my to do list was to recruit help!  So, thanks to 5 other wonderful ladies, I had enough help to make this an awesome shower for her.  I did most of the decor and party favors while the other ladies took care of all the food, games, prizes and other random details.  So, thanks again to Michelle, Rachel, Sarah, Ursula, and Christy for helping me!

Anyway… I suppose you’d like to see the pictures now, huh?  Here goes:

Banner made from paper and buttons and some garden twine.  (idea from here)

I found these awesome hanging decorations here.  They were pretty easy to make.  The large ones take 12 sheets of 12X12 paper… the small ones that I made are  5 1/2″ diameter.
close up detail

Printed out these branches (actually 4 sheets, glued together) and covered my picture frame shelves with them.  I am really happy with how they turned out and it was such an easy way to add to the decor.  The green owl is also a printout.  Thanks to a friend, I was able to borrow some owl things (top shelf) and found a couple crochet patterns online and made a couple more.)
Crocheted owl … pattern found HERE

Another crocheted owl… HERE is the pattern
The tables

Owl printout (2 sheets glued together to be double sided) and I didn’t glue the bottom, so that it could just sit in the branches.

Gorgeous owl vase borrowed from a friend

Borrowed Owl Pitcher
Borrowed stuffed owl

One of the games
Napkins

Michelle made the super cute food labels and the food was amazing!  sooo yummy

Adorable owl cupcakes

These are the party favors.  I sewed these little owls sorta using THIS idea (original pattern here), but redesigned the pattern a little to make them able to open … and used a small piece of velcro to hold the beaks shut.  Then I made some homemade caramel corn to fill them with (in little baggies) … I just used up buttons from my collection, so each owl was one of a kind.
Lastly, here are some other links for ideas:

SUPER cute Owl purse

So there you go!  Congrats Angie and can’t wait to meet the new little guy!

Mr. Men Little Miss 2 year old party with Kindermusik

 My baby is 2! Cannot believe it! For her 2 year party, I did another Kindermusik party (I have done that with all my kids’ 1st and 2nd birthdays). I found some Mr Men Little Miss on major clearance at birthdayexpress.com and I thought they were cute when I was a kid, so I went with that! We decided to have a joint birthday party with a friend (who happened to have the nickname Mr Man), so it worked out great. Not a whole lot to talk about, so let’s just go to the pictures!

music time

check out the cool rainbow cake Tracy made
loves her new sleeping bag from nana and papa L

And the baby from a bigger sis
favors for the siblings

favors for the 2 year olds
HAPPY BIRTHDAY SWEET TRINA!!

4 year old Princess party

A few weeks ago, my daughter turned 4 and after changing her mind quite a few times, she decided on a princess party.  So the first thing I did was hire a “real” princess to come out to our house.  I had been to another birthday party and saw her there and she was amazing with the kids and told them a story with puppets for probably 20-30 minutes long and the kids were so engaged … boys and girls!  She was great and had to much energy.  So, I requested her to come.  Then, the night before the party, the company called and said our princess threw her back out and wouldn’t be able to come the following morning and they don’t have any backups!  Thankfully this all happened while I was out and my awesome husband, called another company and was lucky to find another princess with time to come out to our party!  Whew!  I was thankful I didn’t need to come up with other activities to do for the party or dress as a princess myself!  Eeek.  (Turned out she was great also, so another bonus.)  The party was so cute and my daughter had a lot of fun. 
Here are some pictures from the party:

I made the princesses and other decorations on my cricut.. very time consuming, but love how they turned out!

last minute decision to add some princesses to the table!

was happy to find a non-disney princess at birthdayexpress.com

wands and swords to decorate while the princess did face-painting

Storytime!

cake from Fred Meyer

homemade jewel candy for favors

favors
HAPPY BIRTHDAY CAYLEY!!!

Around the World birthday party

A couple nights ago, we celebrated Elise’s 7th birthday with an Around-the-World birthday party.  We had 12 girls here and we boarded Birthday Airlines and visited 7 different locations on 7 different continents.  It was a fun party to plan and she and the other girls had a great time.  Here are the details!
When each girl arrived, we welcomed them and I took their picture (to put it their passports later), then they went over to see Agent Elise at the US Customs and Immigration table where they were given a passport with their name inside.  I got these cute little passports from Oriental Trading.

Then the girls were given these itineraries to color while we waited for the other guests to arrive:
So, we then all loaded the “airplane” (and all the kids grabbed onto a rope).  We (my husband and I) introduced ourselves as the pilot and flight attendant and we described briefly that we will be visiting different countries and getting souvenirs from each place we visit. 
our name tags

1st stop:  North America – USA – Minnesota – Mall of America
We made a stop at the Mall of America in Minnesota (upstairs in our room) as our USA stop.  There, the girls took turns “shopping” for their luggage to take on the trip.  They also received a USA glitter tattoo and a red, white and blue sucker.  Then we “stamped” their passports for the next stop.

forgot to take a picture before the party, but all the purses were lined up top.
the “luggage” they each picked one

2nd stop: South America – Peru
We flew back downstairs to Peru (the dining room) where all the kids were able to decorate maracas with wood markers. The maracas were the souvenir.

For each country, I printed out their flag, map and a few pictures from the country.
the inside of the passports… there was a country stamp and I printed an animal or icon on sticker paper to stick in there.

3rd stop: Africa – Kenya
Next up was Kenya (the living room).  Here we played Safari bingo.  I made bingo cards with a lot of different safari animals.  There was no prize for the winner, but the girls had a fun time.  I didn’t have bingo markers, so I used cut up post it notes… worked ok, but they really stuck together, so it was a little difficult for the girls to use, but the good thing was that they stayed in place if they moved or bumped their cards.  
The souvenir for Kenya were safari animal charms (2 per child) in a little package I made out of ziplock snack bags (because I forgot to buy tinsy jewelry type ziplock bags… these would have been much better.)  They also got to keep their bingo cards (which they were surprisingly excited about).  🙂
Oh.. and we played African music in the background during the game.

4th stop:  Europe – France
After “stamping their passports”, we headed over to France in the family room.  Here, thanks to Instant Netflix, we watched an episode of Madeline (was supposed to be the one about the Eiffel Tower, but there was a technical issue and they watched the one about the Louvre).  Madeline is a cartoon about a girl from France.  While they were watching the 20 minute show, it gave me time to set out the food and cook the pizza.  After the show, they collected their Eiffel Tower charms (ordered from Etsy and shipped from China… he he) and their Euro chocolates (from World Market) and they took a quick train ride to Italy for some pizza, breadsticks, salad, fruit and juice boxes.

After lunch we headed to our 5th stop:  Asia – China
China needed to be in the entryway (I was running out of rooms).  In China, we played pin the tail on the dragon with a dragon I printed out and taped together to make a large dragon and I printed out extra tails.  (it was hard to find a dragon that wasn’t too scary looking!)  I had also purchased supplies for making a ribbon dragon craft, but the kids were getting a little restless at this point, so I just sent that home to make with their mommies.  It would have been a lot of glueing anyway.  They also got these gorgeous wood fans and a fortune cookie for their souvenirs.

Next, off to the 6th place: Australia
Australia was in Elise’s bedroom and here we played a fun game with the girls.  We formed 2 teams and had a kangaroo hop race (with a globe between their knees).  🙂  Good to get a little of that energy out.  The souvenir was a pink or purple boomerang and an inflatable globe

Last stop (bet you can guess): Antarctica
Antarctica was in the kitchen, but we needed tables, so it was more of a fly by Antarctica (too cold to stop there anyway, right?)  The activity for here was melting their ice to find the prize inside.  We gave each girl a cup of hot water to melt their ice cube and inside was a chain (so they could put their charms on it)

I also printed out pictures of the kids I took in the beginning onto sticker paper and they put them in their passports above their name. 
The plan was to fly back to the US for cake, but we technically never did fly back.  We just stayed where we were, sang Happy Birthday for ice cream cake.  Then, opened presents and the girls had time to free play a little before their parents came to pick them up.  It was a really fun party, I think!  Happy birthday Elise!!

Train craft for preschool

I haven’t been posting as many of the home preschool crafts as I thought I would, but this one was so cute and the kids (boy/girl age 3) had so much fun with it, I just had to make time to post this one.  Enjoy!

Here is a picture of the train completed:

Getting started
Here’s what you need to make 2 trains:

*toilet paper rolls
*black marker
*yarn or fishing line
*paper punch
*cardboard
*colored construction paper
*plastic drinking straws (not in picture)
*glue (hot glue works best
*a few coins to weigh down the engine and caboose (optional)

I will post a picture of the original instructions on the left and tips/things I did on the right. below:

We made the train with an engine, caboose and 3 cars in the middle which worked great… so 5 rolls.

  
I cut the construction paper in strips 4-1/2″ wide.  One blue, one red and 3 yellow per train.  I let the kids glue the papers onto the toilet paper rolls.

  
I would say it would be easier to cut the yarn at LEAST 4 inches long or longer, and cut off the excess.  We cut ours about 4 inches and it would have been a little easier to tie had we cut them a little longer.

  
see my comment on number 3.  🙂


the length of the straw doesn’t need to be so exact… just make sure it it shorter than the length of the toilet paper roll, so it doesn’t show after it is glued inside.  the side where you punched the holes and tied the string is the bottom side of the train and so you glue (I recommend hot glue) the straw to the inside TOP of the toilet paper roll so that it sits fairly straight through the roll. 

When cutting the string that the train will run on… cut is REALLY long.  We had our trains running on a line about 17 feet which seemed to work great.


 For this part, I actually premade most of the “decorations” for the train.  It would have been a little too hard for 3 year olds to do.  (see “detail” picture below)  I used construction paper for the wheels (conveniently cut out with my Cricut, but you can do it the old fashion way too!), I used some thin cardboard to make the tops for the engine and caboose (into a square with a top and cut 2 half circles to fit onto the tube) and covered them with construction paper and drew with markers the windows. and I just coiled up a strip of black construction paper for the smoke stack.

TIP: glue on the tops of the engine/caboose before the wheels… as you can see I didn’t do that and the wheels got covered up.

We attached the line tightly and taut to 2 heavy dining chairs, so the kids could race them next to each other. 

Hope this all makes sense!  Your kids will love this one!

5-year old Hello Kitty party

After a half year off, birthday season has come once again.  So, to start things off, Nora decided she would like a Hello Kitty party this year.  I love Hello Kitty, so it was a fun party to plan and relatively easy. 
First off were the invitations:

I bought the Hello Kitty cartridge for my Cricut die cut machine to make these and headed to Ben Franklin to get the cute papers.  For the inside, my super easy trick to adding the words is to print them out on Avery clear full sheet labels found at an office supply store… I love this stuff!  Then you can just cut it to the shape you want and stick it on exactly were you want it.

For the decorations:  I made some more Hello Kitty wall decor from my Cricut and put them all over the walls along with printing off some larger Hello Kitty faces and Daniel (the boy Hello Kitty) because there were boys coming to the party. 

The printed Hello Kitties are a little trickier… since you can’t find large images online with supercrisp edges, I usually find some that I like and “trace” them in Adobe Illustrator (which is a designer’s program that can create images that look crisp and sharp no matter how big or small you stretch stretch them).  (Note: I didn’t make the poster)
I also had the girls go around the house on a Hello Kitty treasure hunt to find little things for decorations like stuffed dolls, books, etc.  And then I bought the licensed plates/cups/table cover, etc. 

For the games:  I did 3 games, plus a pinata.  As we were waiting for more guests to arrive, my wonderful helper and husband, Dave, had the kids in a circle and played “hot potato” using a ball of yarn as the “potato”.  The kids were having fun just tossing it around really fast that we never did end up using the music (we picked the DisneyMania rock version of “We are Siamese” from Lady and the Tramp).  The second game was pin the bow on the Hello Kitty (bought this one).  For the third game, while the kids were eating, I hid a bunch of mice around the room and then had them all get on their hands and knees like Kitties and hunt for the mice.  🙂  They were pretty freaky looking mice too… I was thankful to find them in the Halloween section of the party store.  The pinata was a pull-string one (and it actually worked this time!!) and we filled with candy (of course), stickers, and silly bands!

Food:  This was a pretty easy one this time… only required about a half hour or so of prep time before the party.. it was awesome!  Mini pizzas (English muffins with a little pizza sauce and cheese and baked until the cheese melts), Papa Murphy’s pizza for the adults, strawberry (PINK!) gogurt, strawberries and apples cut up into a little fruit salad, caesar salad for the adults.  Drinks: PINK raspberry lemonaide, Pink strawberry milk or water.  This time we had all the kids sit down at the table and dished up in the kitchen and handed all the kids their plate (was a lot easier than having them all go through a line).  I forgot to take a picture when the food was out, but here are the before pictures:

The cake was from Fred Meyer:  white with white whipped frosting and german chocolate in the middle… it was SUPER yummy!

For the party favors, when the guests first game, they got either a flower clippie for their hair or bow ties for the boys (but the boys didn’t really want to wear them, oh well).  I made the flowers out of pink and yellow Sculpey (with 2 holes in the middle of the flower) and baked them, then used pipe cleaner to add them to silver barretts.  As the guests were leaving, they got a bag with the rest of the favors:  I found some 100 piece puzzles for a really good price at Michaels (Hello Kitty or Princesses for the girls and Toy Story, Cars, etc for the boys), glow bracelets, and for the girls, Hello Kitty lip gloss (Target) and for the boys, a couple sports $1 items.


 And that’s about it!  Happy birthday Nora!!

Trina’s 1st birthday party!

So, another week, another birthday celebration!  This time we celebrated my youngest’s first birthday!  She was super happy and I think she had a great time at her party! 

This was a much simpler party that last week’s because we had the entertainment coming in… my friend, Ms. Rebecca from The Musik Nest came to do a little musical party for the wee ones.  We have had her at all my kids’ 1st and 2nd birthday parties because she is so good with the kids and it is just great for a baby party.

We went with a ladybug theme.  I found a party set that I loved from birthdayexpress.com to order the plates/napkins cups/t-shirt/balloon/etc from and then I traced the 3 different styles of ladybugs in Adobe Illustrator to be able to use to make more of my own decorations.  So, I used those on the evite, to print out for table decorations, to tape to the walls and for making a banner.  I also ordered a ladybug cake pan and decorated Trina’s own personal cake to dig into… her first taste of sugar.

Here are some pictures from the party!

Setting up:
Baby finger foods:
Trina’s ladybug cake:
The birthday girl just woke up from her nap and is ready to party!
Notice the super cute party themed shirt!: 
Music time: 
Trina with her little friends: 
Cake time: 
She likes the little ladybugs! 
Oh yeah!: 
So dainty: 
 
 
My favorite: 
Ladybug pillow from nana and papa: 
Party favors for the babies:
Party favors for the sibblings:

Happy birthday Sweet Trina!!

Cayley’s Max and Ruby party

Yesterday was Cayley’s 3-year old birthday party.  Since she loves Max and Ruby, we wanted to make that the party theme.  Thankfully I started planning this over a month ago because there are no licenced Max and Ruby party supplies.  So, I had to get creative and come up with my own ideas.  So … I started with these websites that I found:
A blog from someone else who did a Max and Ruby party, the author (Rosemary Wells) website, and Nick, Jr.

So, I worked on printing out coloring activities for the tables, printing out most of the “bunny party” ideas from the authors website, bought a homemade Max and Ruby pinata from ebay (super cute), made lilypads and a grass poster for to decorate the bathtub for one of the games, printed out stickers, ordered mostly solid colored plates/cups, books and windup toys for party favors, etc…

So here was my party schedule:

11am – Kids arrive — color on tables and eat lunch
11:30 – Ring toss game/Pin the tail on Max
11:45 – Watch Max and Ruby – cake episode (momma hides frogs)
12:00 – Game – Find Max’s frogs and put them back into the pond
12:15 – Pinata
12:30 – Sing Happy Birthday and Cake


Now I will just let you follow along with the party pictures.  Let me know if you want to learn more about something!

Setting up:

The spread:
The cakes:
Max’s cake
Ruby’s cake
The guests arrive:
Games – part 1 (ring toss and pin the tail on Max):
Watching a Max and Ruby episode:
Game – part 2 (find Max’s frogs hidden in the living room and return to the pond):
Pinata:
Cake:
Party favors (minus the candy necklace… didn’t get the pic quick enough):
Happy Birthday Cayley!!!

craft project for a birthday party game!

So, today we started one project to decorate for a game  at the upcoming Max and Ruby birthday party for Cayley.  We are making lily pads to float in the bathtub (I will show you why after the party).  They are so cute and super simple to make!

Here is what you’ll need:
*Foam cups
*Foam plates
*Glue
*Scissors
*Green permanent marker
*Stapler
*Yellow pom poms

Cut the bottom off so it is about 1″ to 1 1/2″ tall

cut out triangles and flare the tips slightly

Cut a heart shape out of the foam plate and color it green with the permanent marker. 

Staple the lily in the center to the green shape. 

Glue on the yellow pom pom to cover the staple and….

Tada!!!